
This is a long post. I won’t be offended if you scroll through and only look at the pictures. As some of you may remember from this post, our kitchen started out looking like this.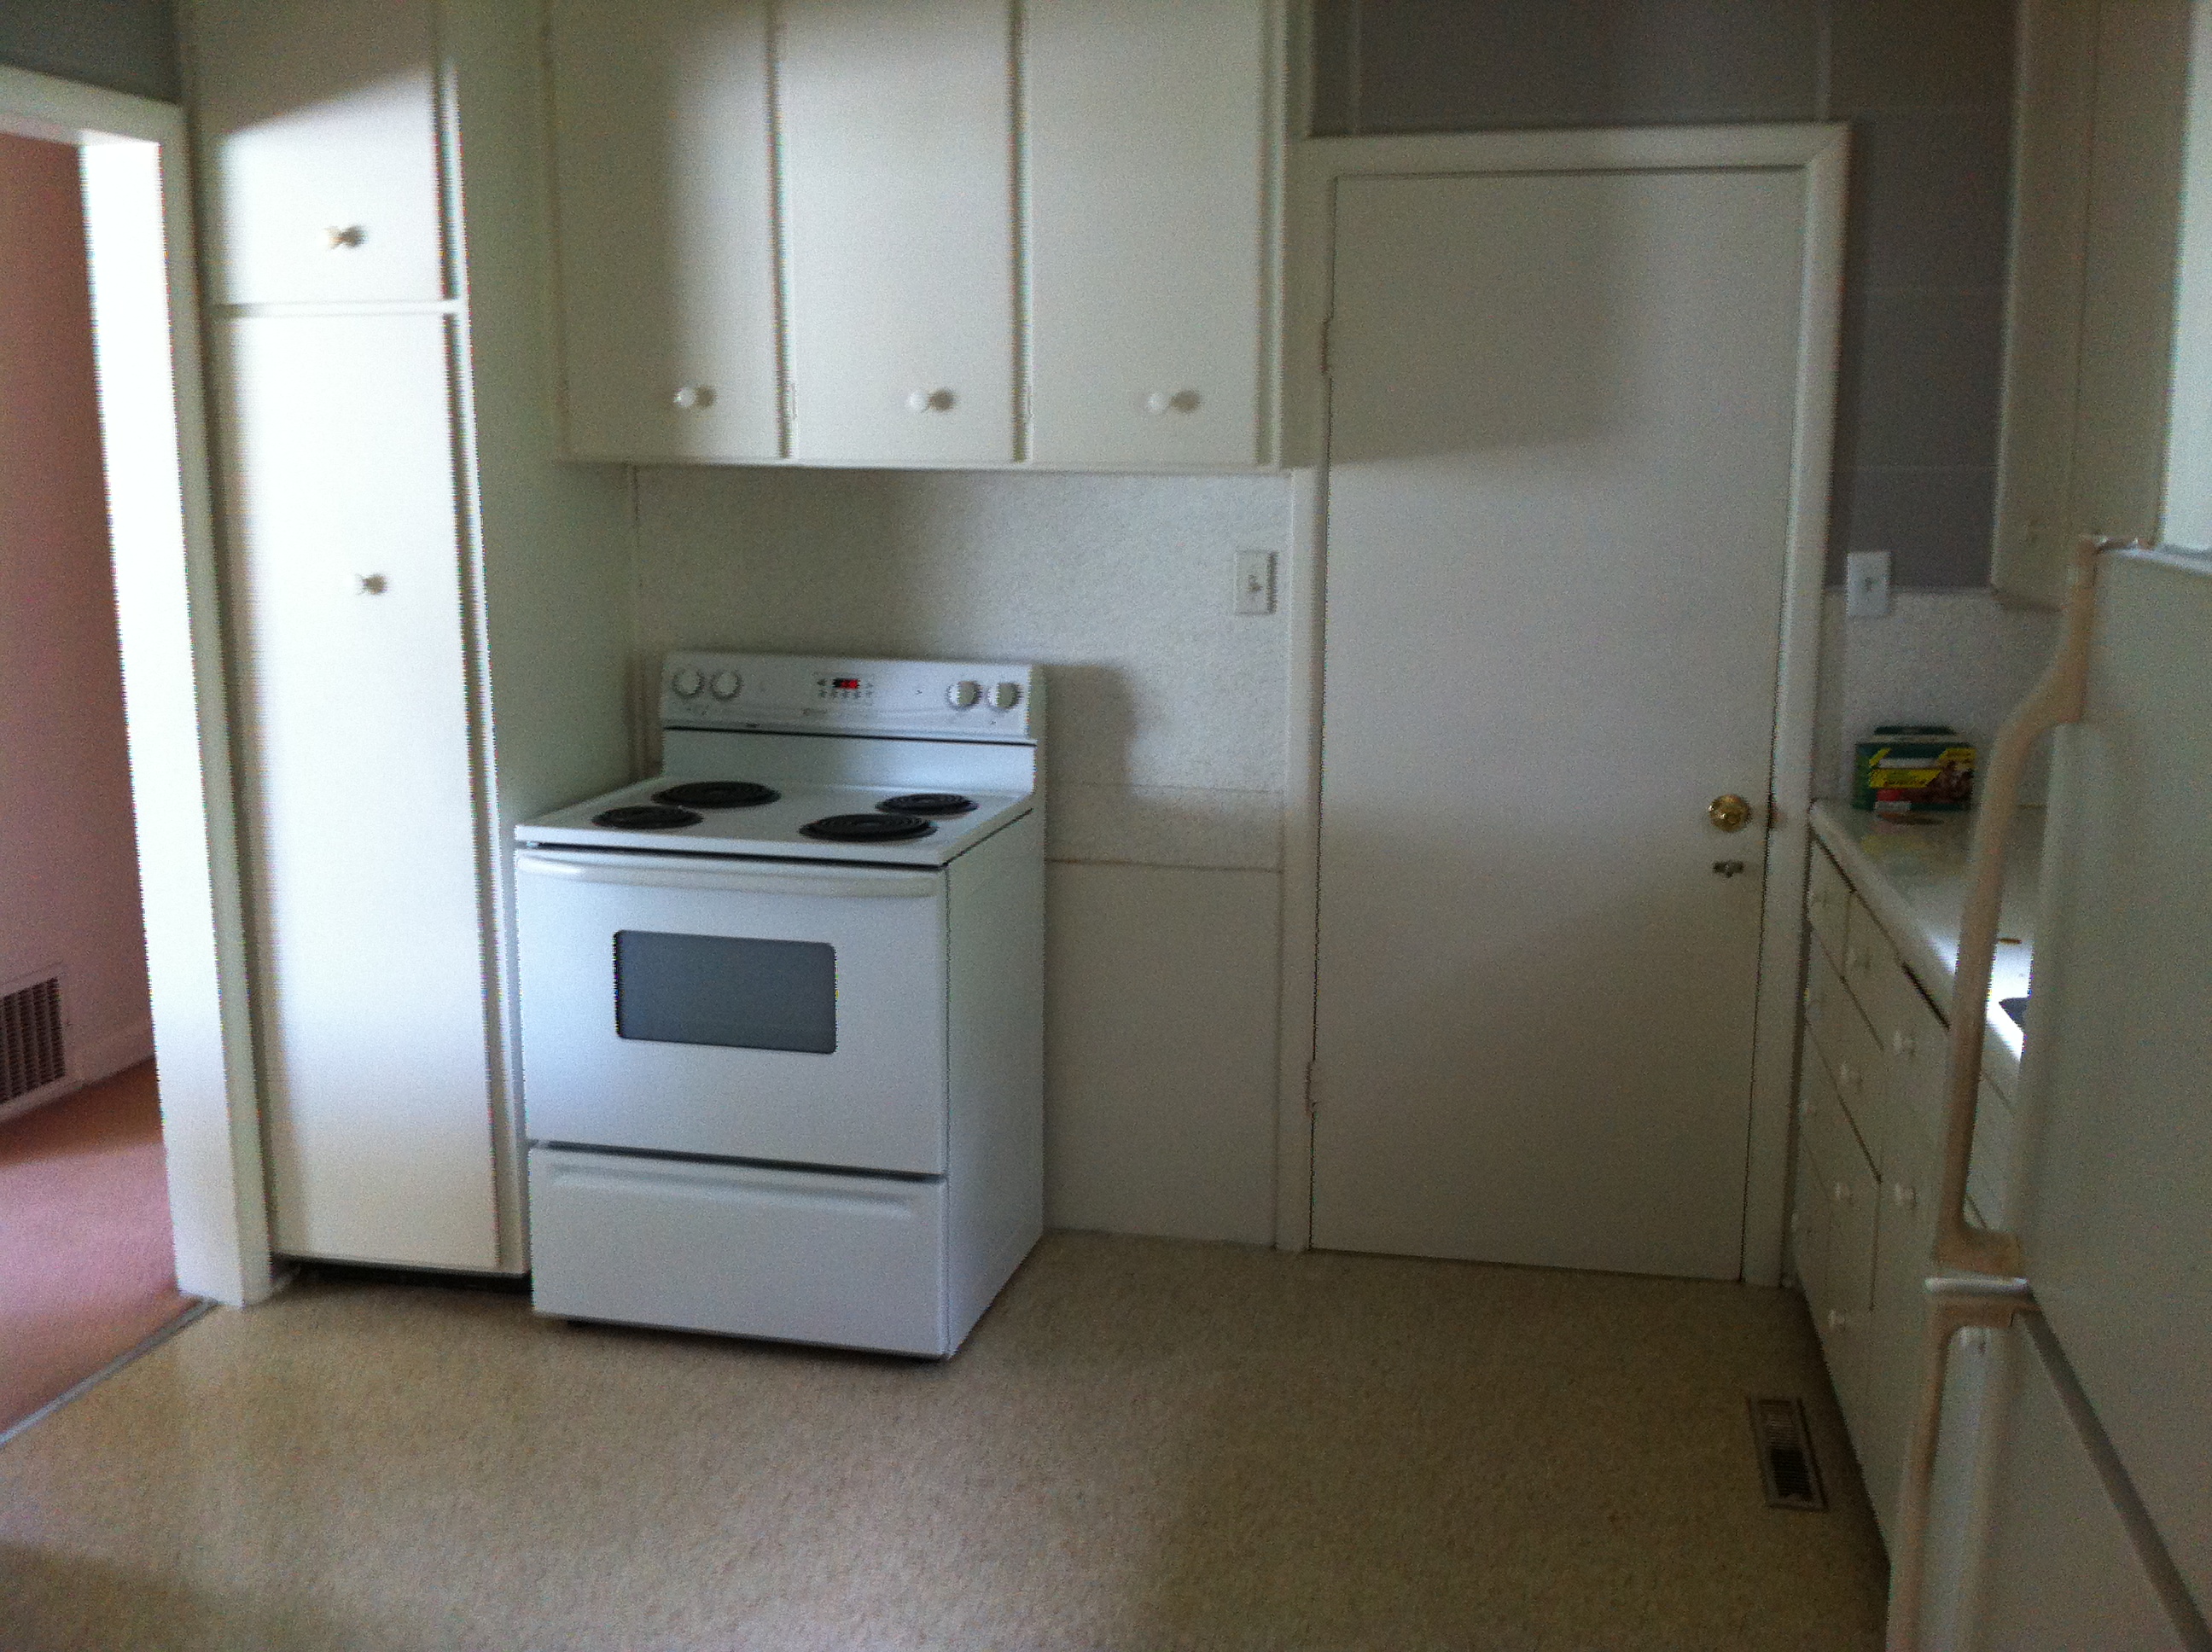

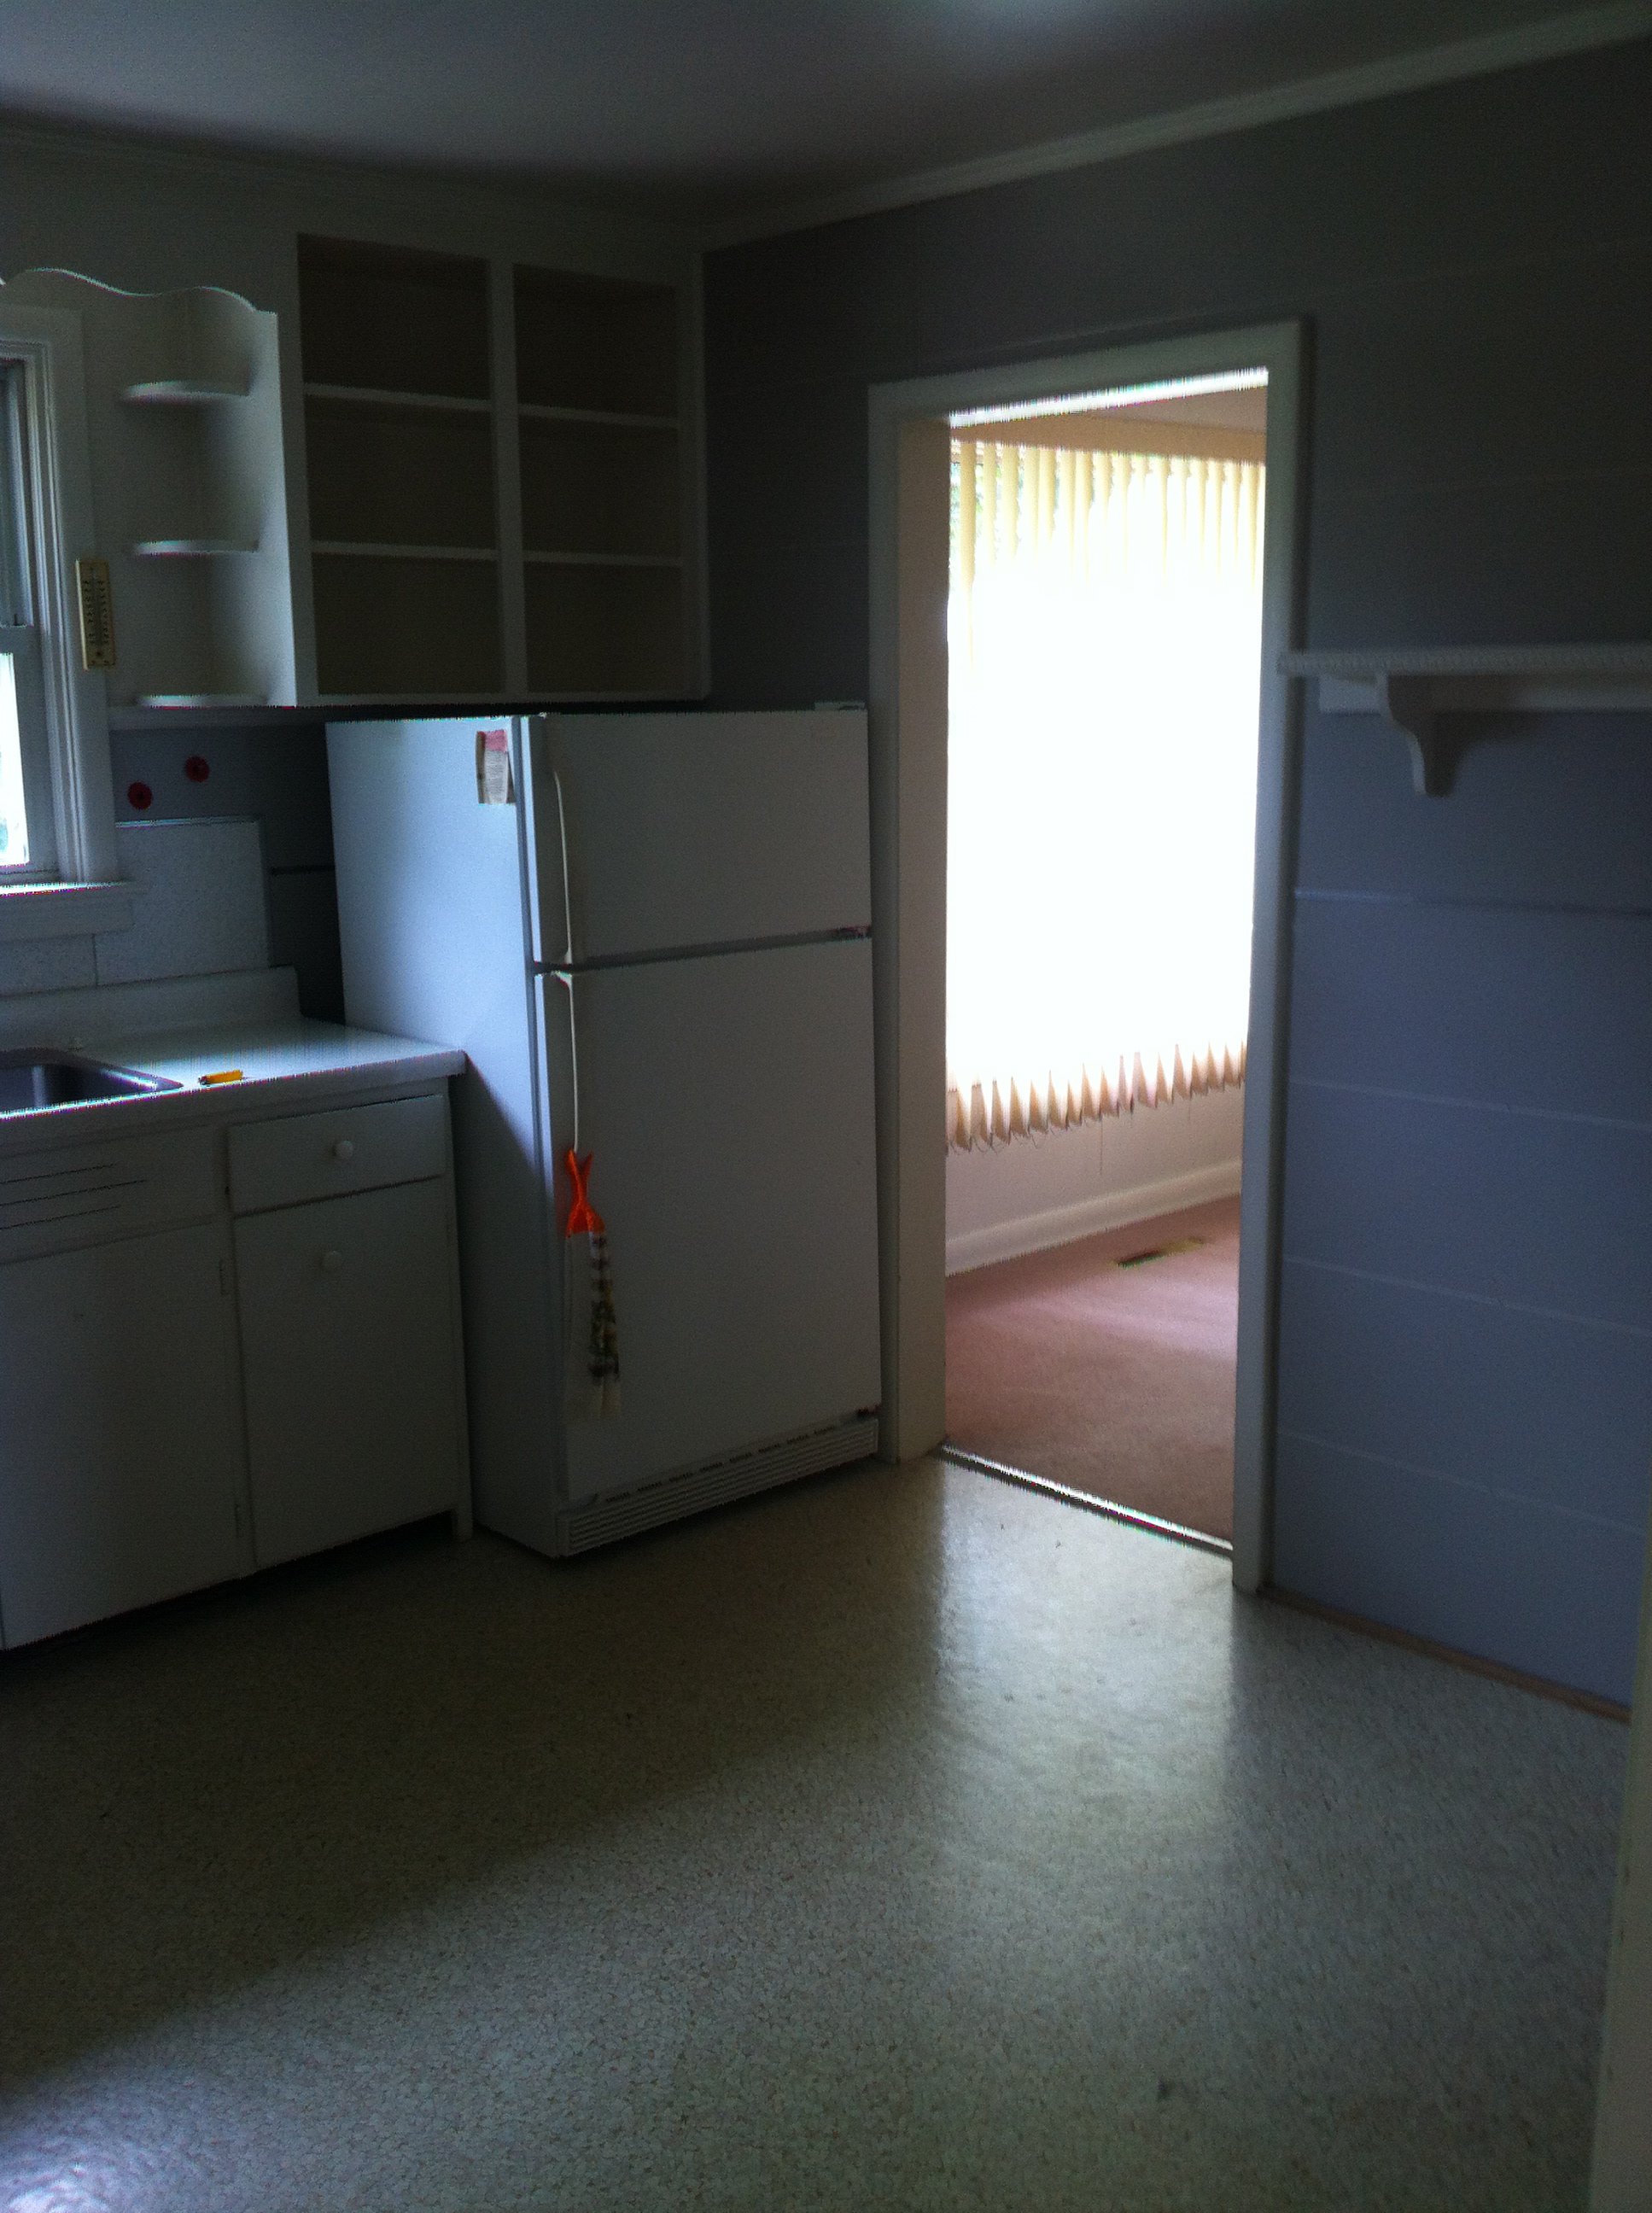
And our separate dining room looked like this.
Then, after taking out all the old cupboards, flooring and the non-load-bearing wall between the kitchen and dining room, everything looked like this.

Then Aaron went to work at putting the new drywall up (the kitchen was not plaster board like the rest of the house, instead it was plywood with a decorative panelling over it) and patching the two rooms back together. Our next step was to lay the new hardwood floor, which you may have already read about here. After doing that, it looked like this.

The next steps are when the kitchen really starts taking shape as a kitchen so I will just take a couple minutes to talk about the kitchen cabinets. We decided to go with Ikea cabinets. If you know me personally at all, you will know that I am thrifty (otherwise known as cheap) and that I excessively research large purchases (which to me is anything over $100). I read countless reviews about the value of ikea cabinets. The only recurring complaint I could find was that there are limited box sizes, which ended up being no trouble for us when using the ikea kitchen planner. Otherwise, the reviews stated that in terms of pre-fab euro-box style cabinets (as opposed to custom face frame or something else custom) Ikea cabinets held up very well and that features such as soft-close doors and drawers were included as standard. Additionally their hardware is all Blum which is a very reputable hardware manufacturer used in higher end cabinets. As far as the doors and cabinet bases which are manufactured by Ikea go, they include a 25 year warranty. I also felt that Ikea, in comparison to any of the big box stores had the nicest looking selections. All this being said, our biggest deciding factor on kitchen cabinets was price. I would have loved the look and quality of custom cabinets with real wood boxes and solid wood doors, but the reality of the situation was that our budget was in the neighbourhood of $5000. Not $40,000. Not even $15,000 or $9,000. And it was very realistic to work in that neighbourhood while using Ikea cabinets. We purchased them during a kitchen sale and we ended up using the gift cards we received to buy our interior fittings and bathroom vanity. Included in our order was an integrated dishwasher, over the range microwave, sink, faucet and the pulls(but not the knobs which we purchased from Overstock).
We chose the Lidi Grey style fronts. Originally we were going to go with the Lidi white, but I was having some reservations about fingerprints and grime being a constant battle. Also, I had seen the grey version on the UK website and was really wishing that they had it available in Canada. Lo and behold, the next trip we made to Ikea, the grey cabinets were being set up on display and would be available in a month! So when the kitchen sale rolled around, we drove down and ordered our full kitchen in the new grey colour. I had also read in reviews that the most difficult part of the process of installing an ikea kitchen was the purchasing part. I will agree with this. It comes in what seems like 1000’s of pieces. We brought Aaron’s sister and her husband’s enclosed trailer with us to pick everything up because delivery seemed like a waste of money when we could do it ourselves. It did almost fill the trailer so don’t think you will be able to just put a kitchen in the back of your van or anything. When we finally brought it into the house, there were a couple hours of sorting and making sure that everything was accounted for. There were also a couple of items that were not in stock which meant a trip back to pick those up later. We also had to make a couple trips to exchange items or pick up more interior fittings. It’s a good thing that I like going to Ikea and that Aaron is patient. It’s also a good thing Ikea has a daycare service for free because Myles grew to love Ikea as well.
The first night we started putting cabinets together, Aaron’s parents came to help us. Whenever starting something new, it was nice to have people there to help to give things a kick start.

Things went pretty quickly. Within a couple of days, the kitchen was looking like this.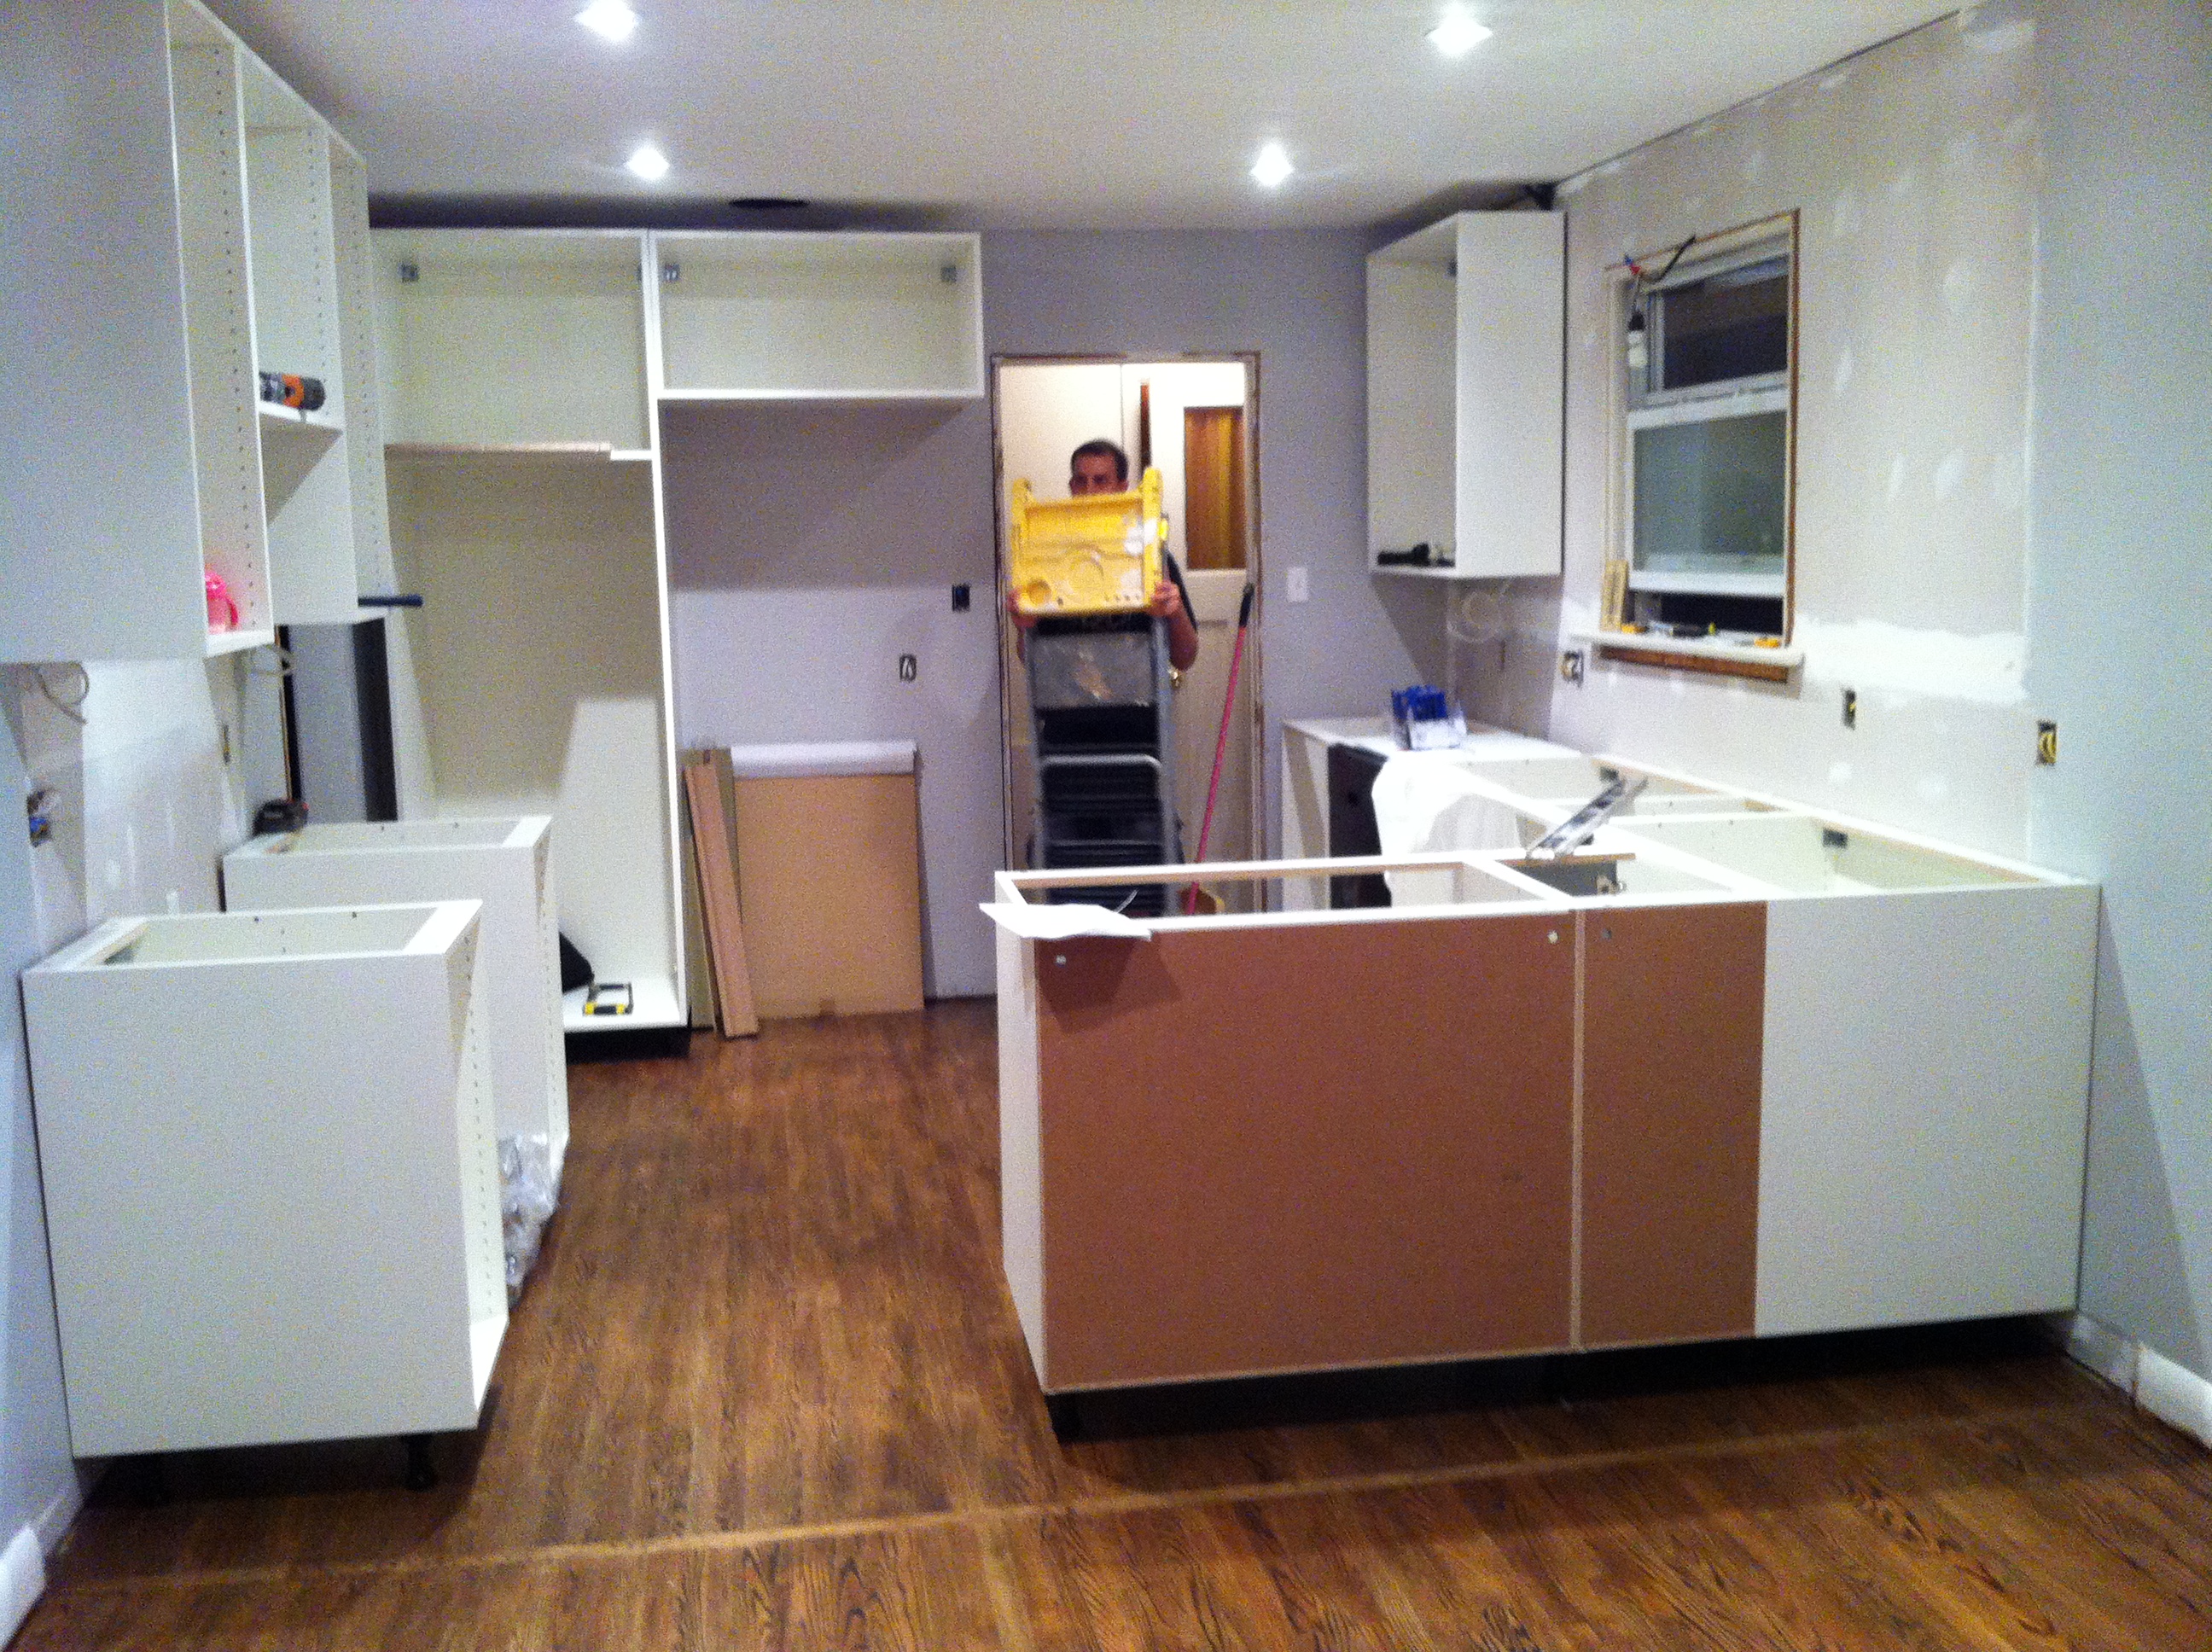
Then like this.

Actually, the above photo coincided with some answered prayer. This was when we sold our old house. Things were starting to get pretty tight financially and we needed to make a decision with what we would do with the old house. Our contract was almost up with our realtor and we didn’t know whether we should renew or take the house off the market and rent it out. I was getting pretty stressed about it, but Aaron was trusting that God would figure it out. Paying two mortgages and the second set of bills that comes with a second mortgage was not easy, but we knew if we could sell, we would be in a great place financially. All along Aaron kept saying “Well we aren’t ready to sell, we don’t even have a place to live yet if we do. I will start getting worried once the kitchen is done.” Then, one night as we were sitting installing drawers and door fronts (I specifically remember sitting on the floor in front of the bank of drawers in the photo above), we got a phone call from our realtor who had some great news. We had an offer! Everything went through and conditions were waived a couple of weeks later. We had about a month after that to finish the house and get everything moved over. It was perfect timing. We would not have been able to finish the house any faster. As it was, we were still moving in with things only partially completed, but I couldn’t have been more thankful. Our gas stove even only got hooked up last week, which is the reason for the title of this post-we can now cook and bake!

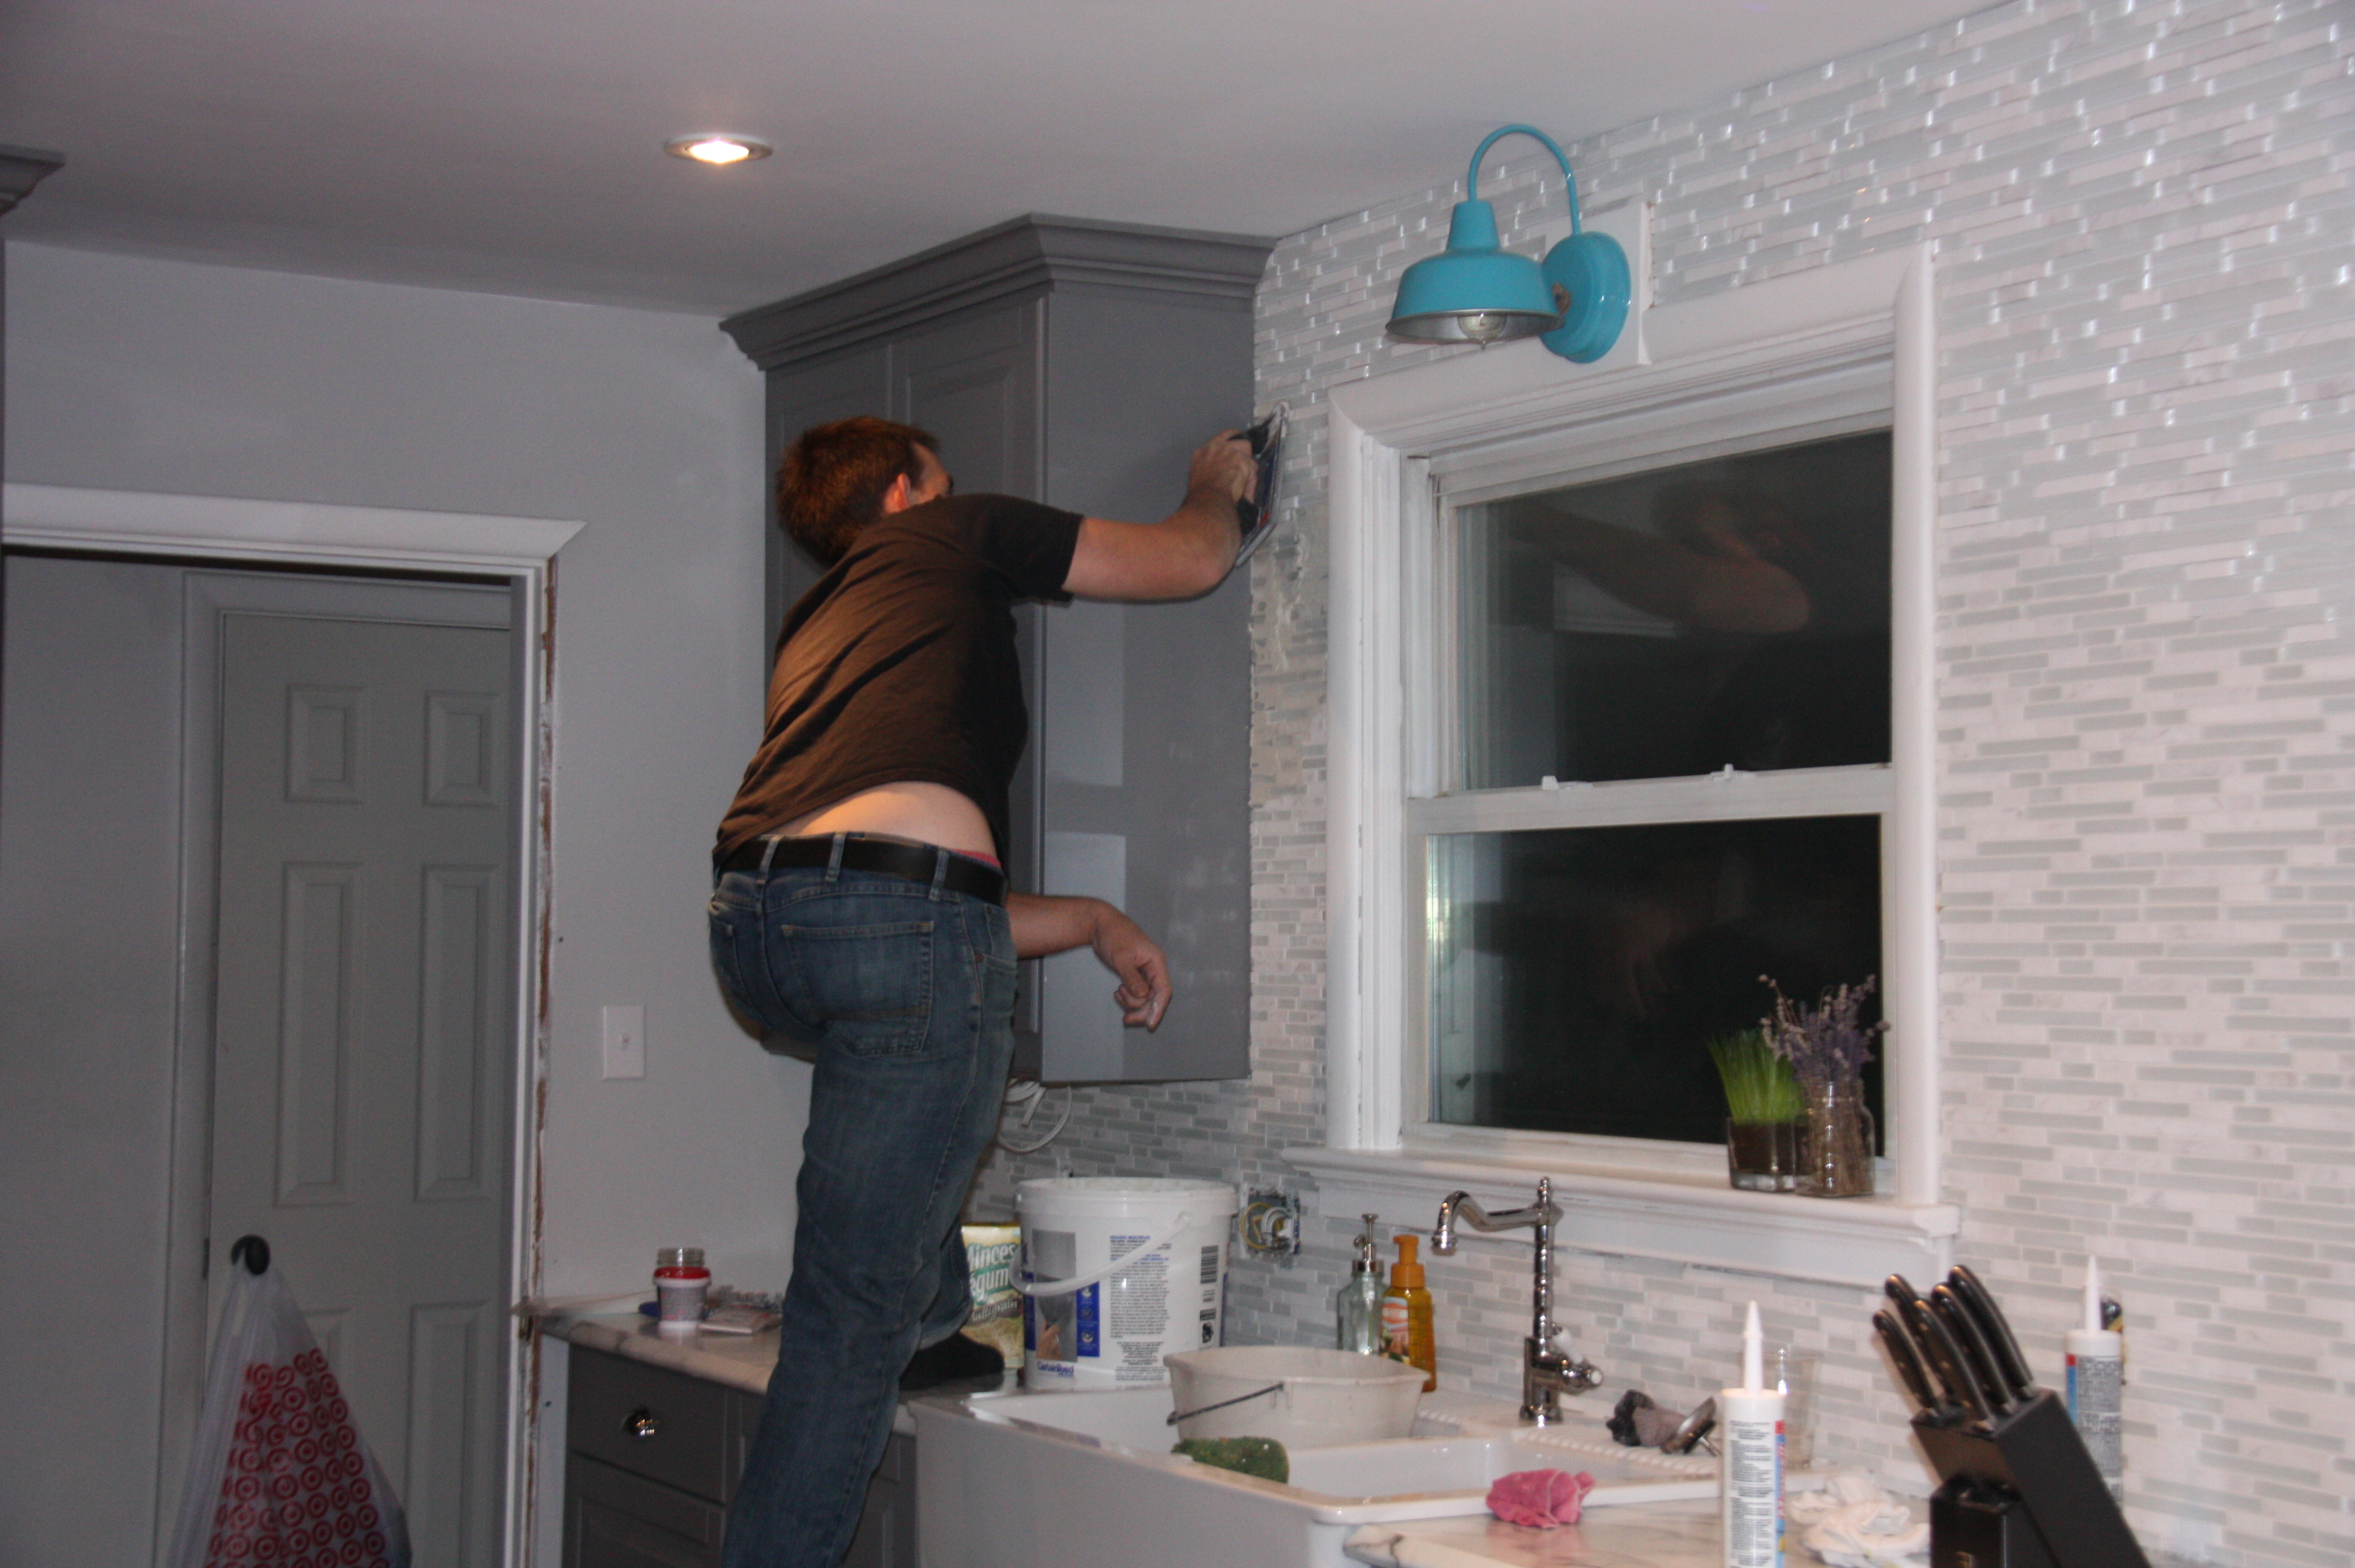
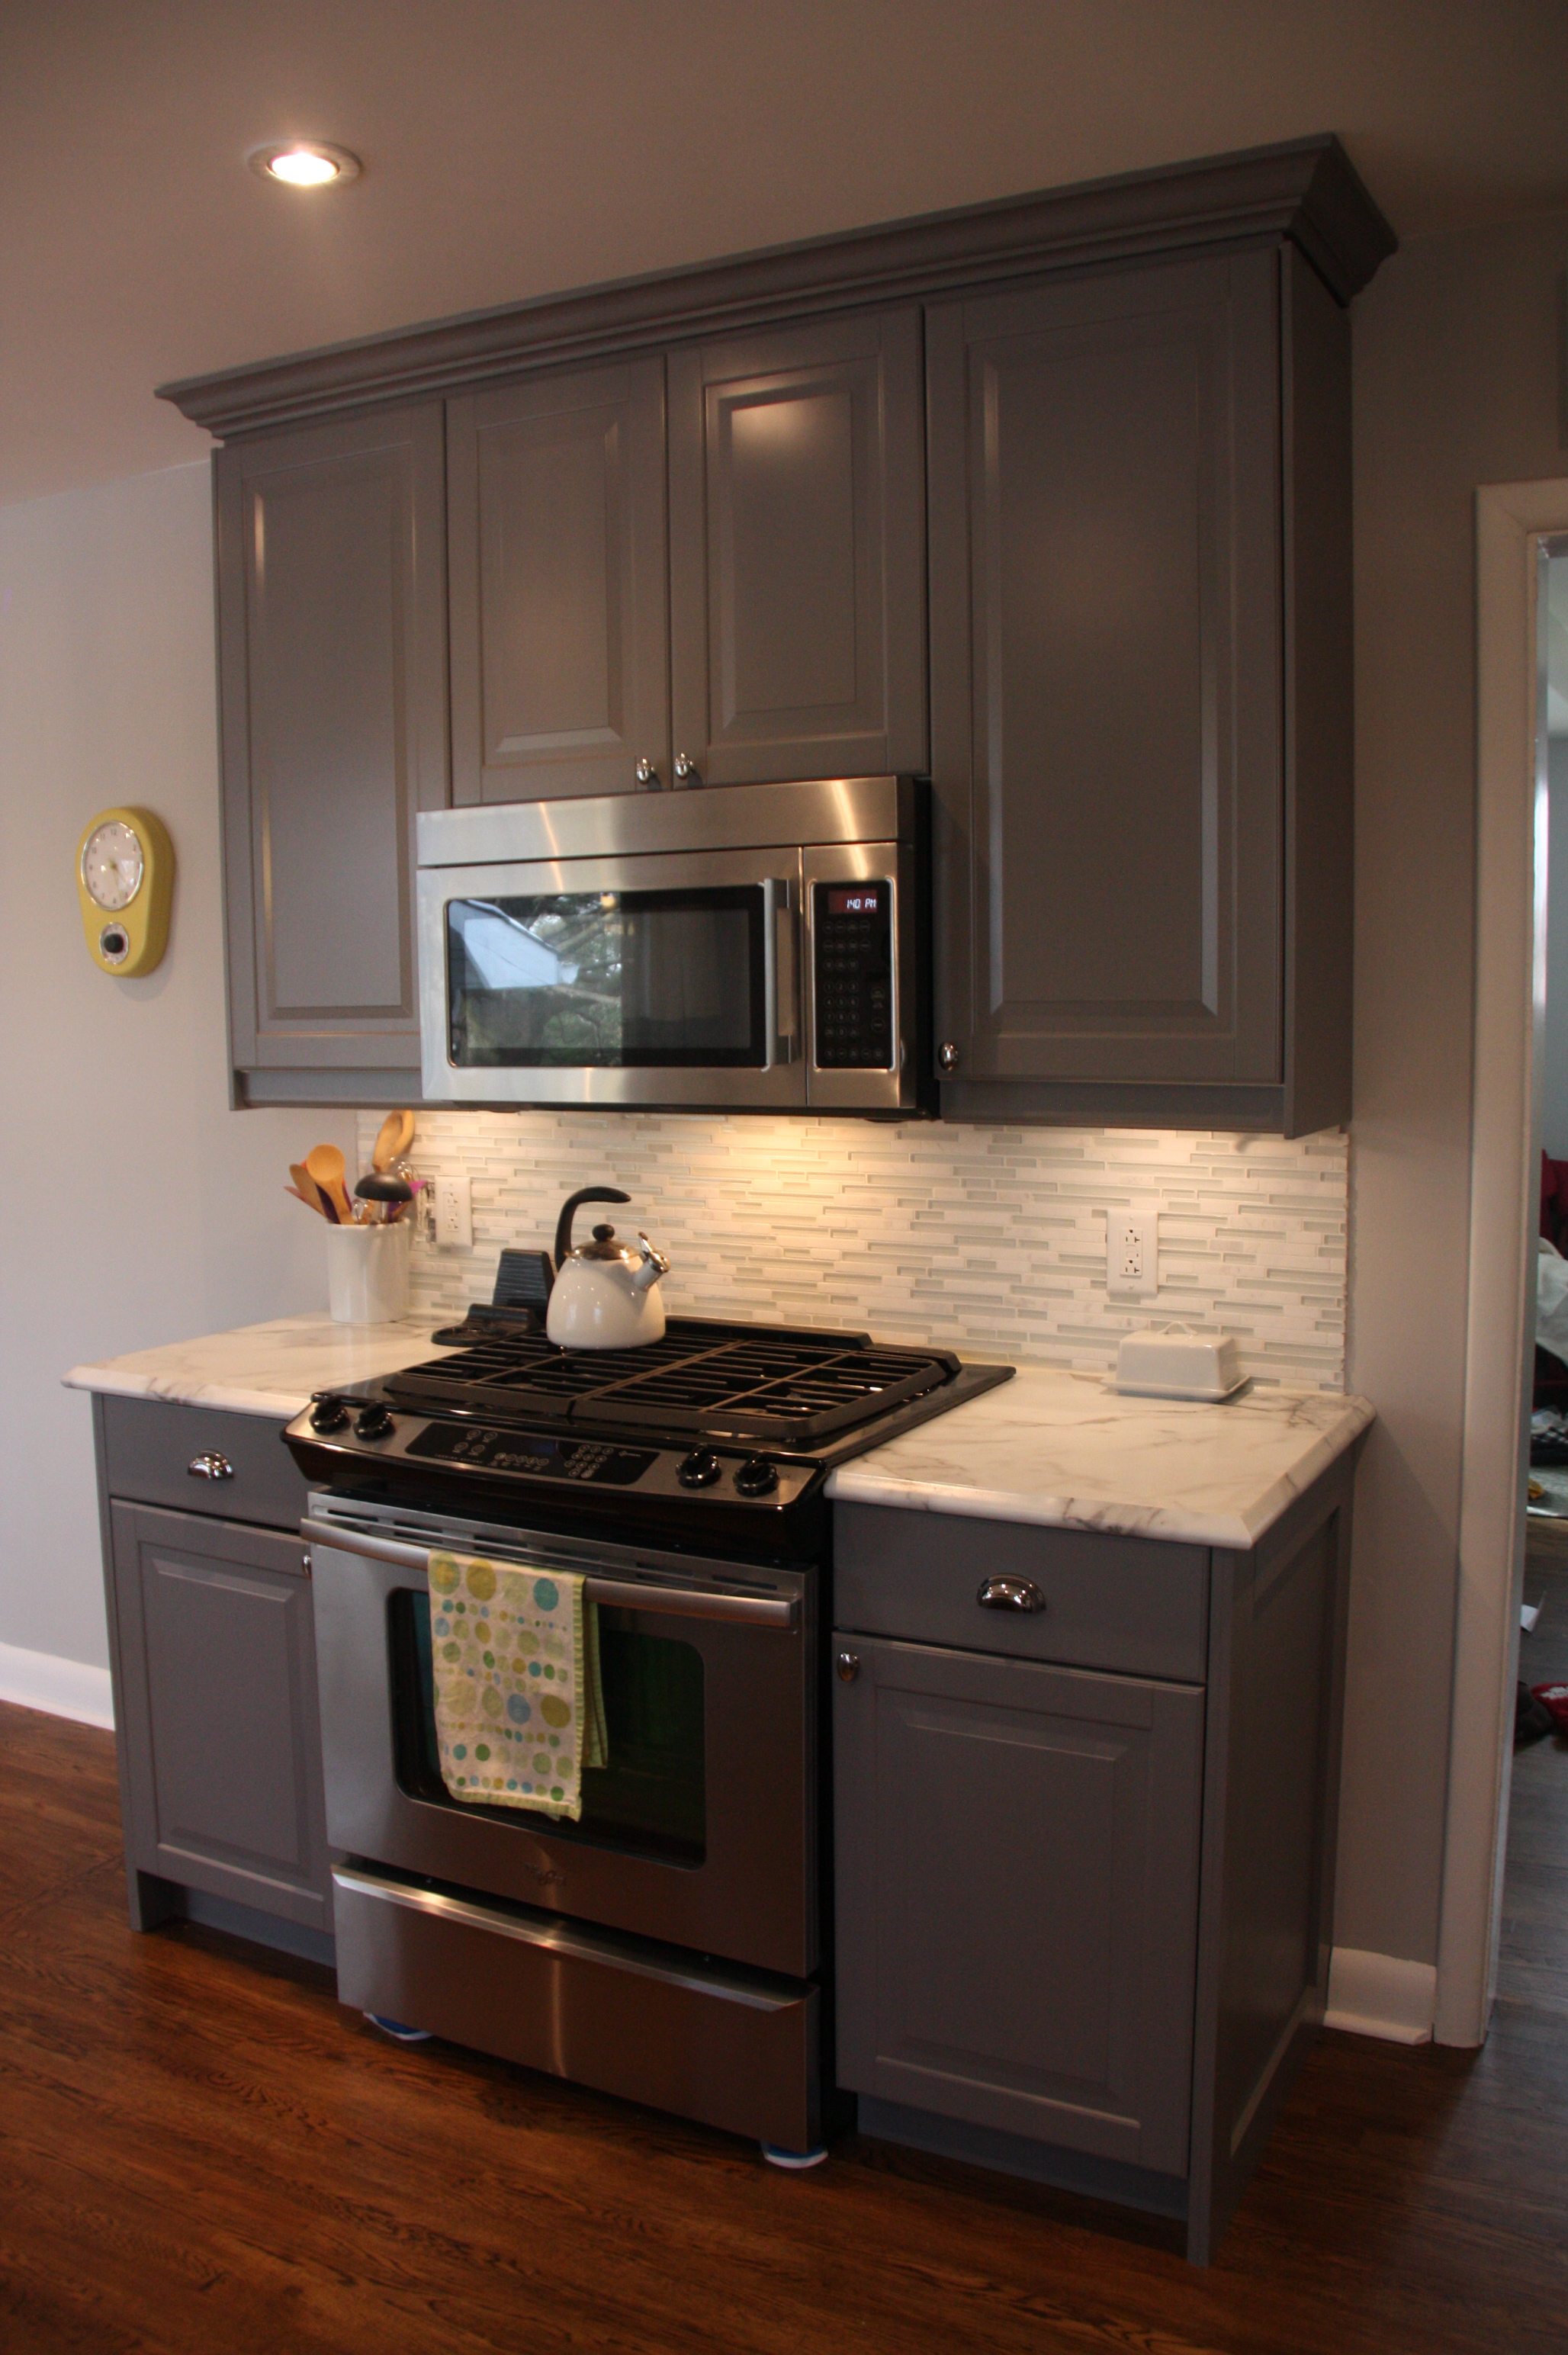
Anyway, after finding out the house sold, we pressed on with the kitchen. Next up was the finishing touches. Aaron did all the trim work himself and I am so proud of how great a job he did! The kick and the moulding at the bottom of the uppers that covers the under cabinet lighting did come from Ikea but the crown and all the moulding on the back and ends of the base cabinets just came from Rona and we painted them a custom matched colour from Benjamin Moore. Doing this instead of buying Ikea’s panels and/or door fronts to use decoratively saved us hundreds of dollars. I wanted big crown because I like the substantial look of it but also because we were making our cabinets look built in right to the ceiling and we needed big crown to do that. Here are a couple pictures of process. To fill the gap between the bottom of the crown and the top of the cabinet, we used a flat piece of trim painted the same grey. This also gave a solid surface to nail the crown to.

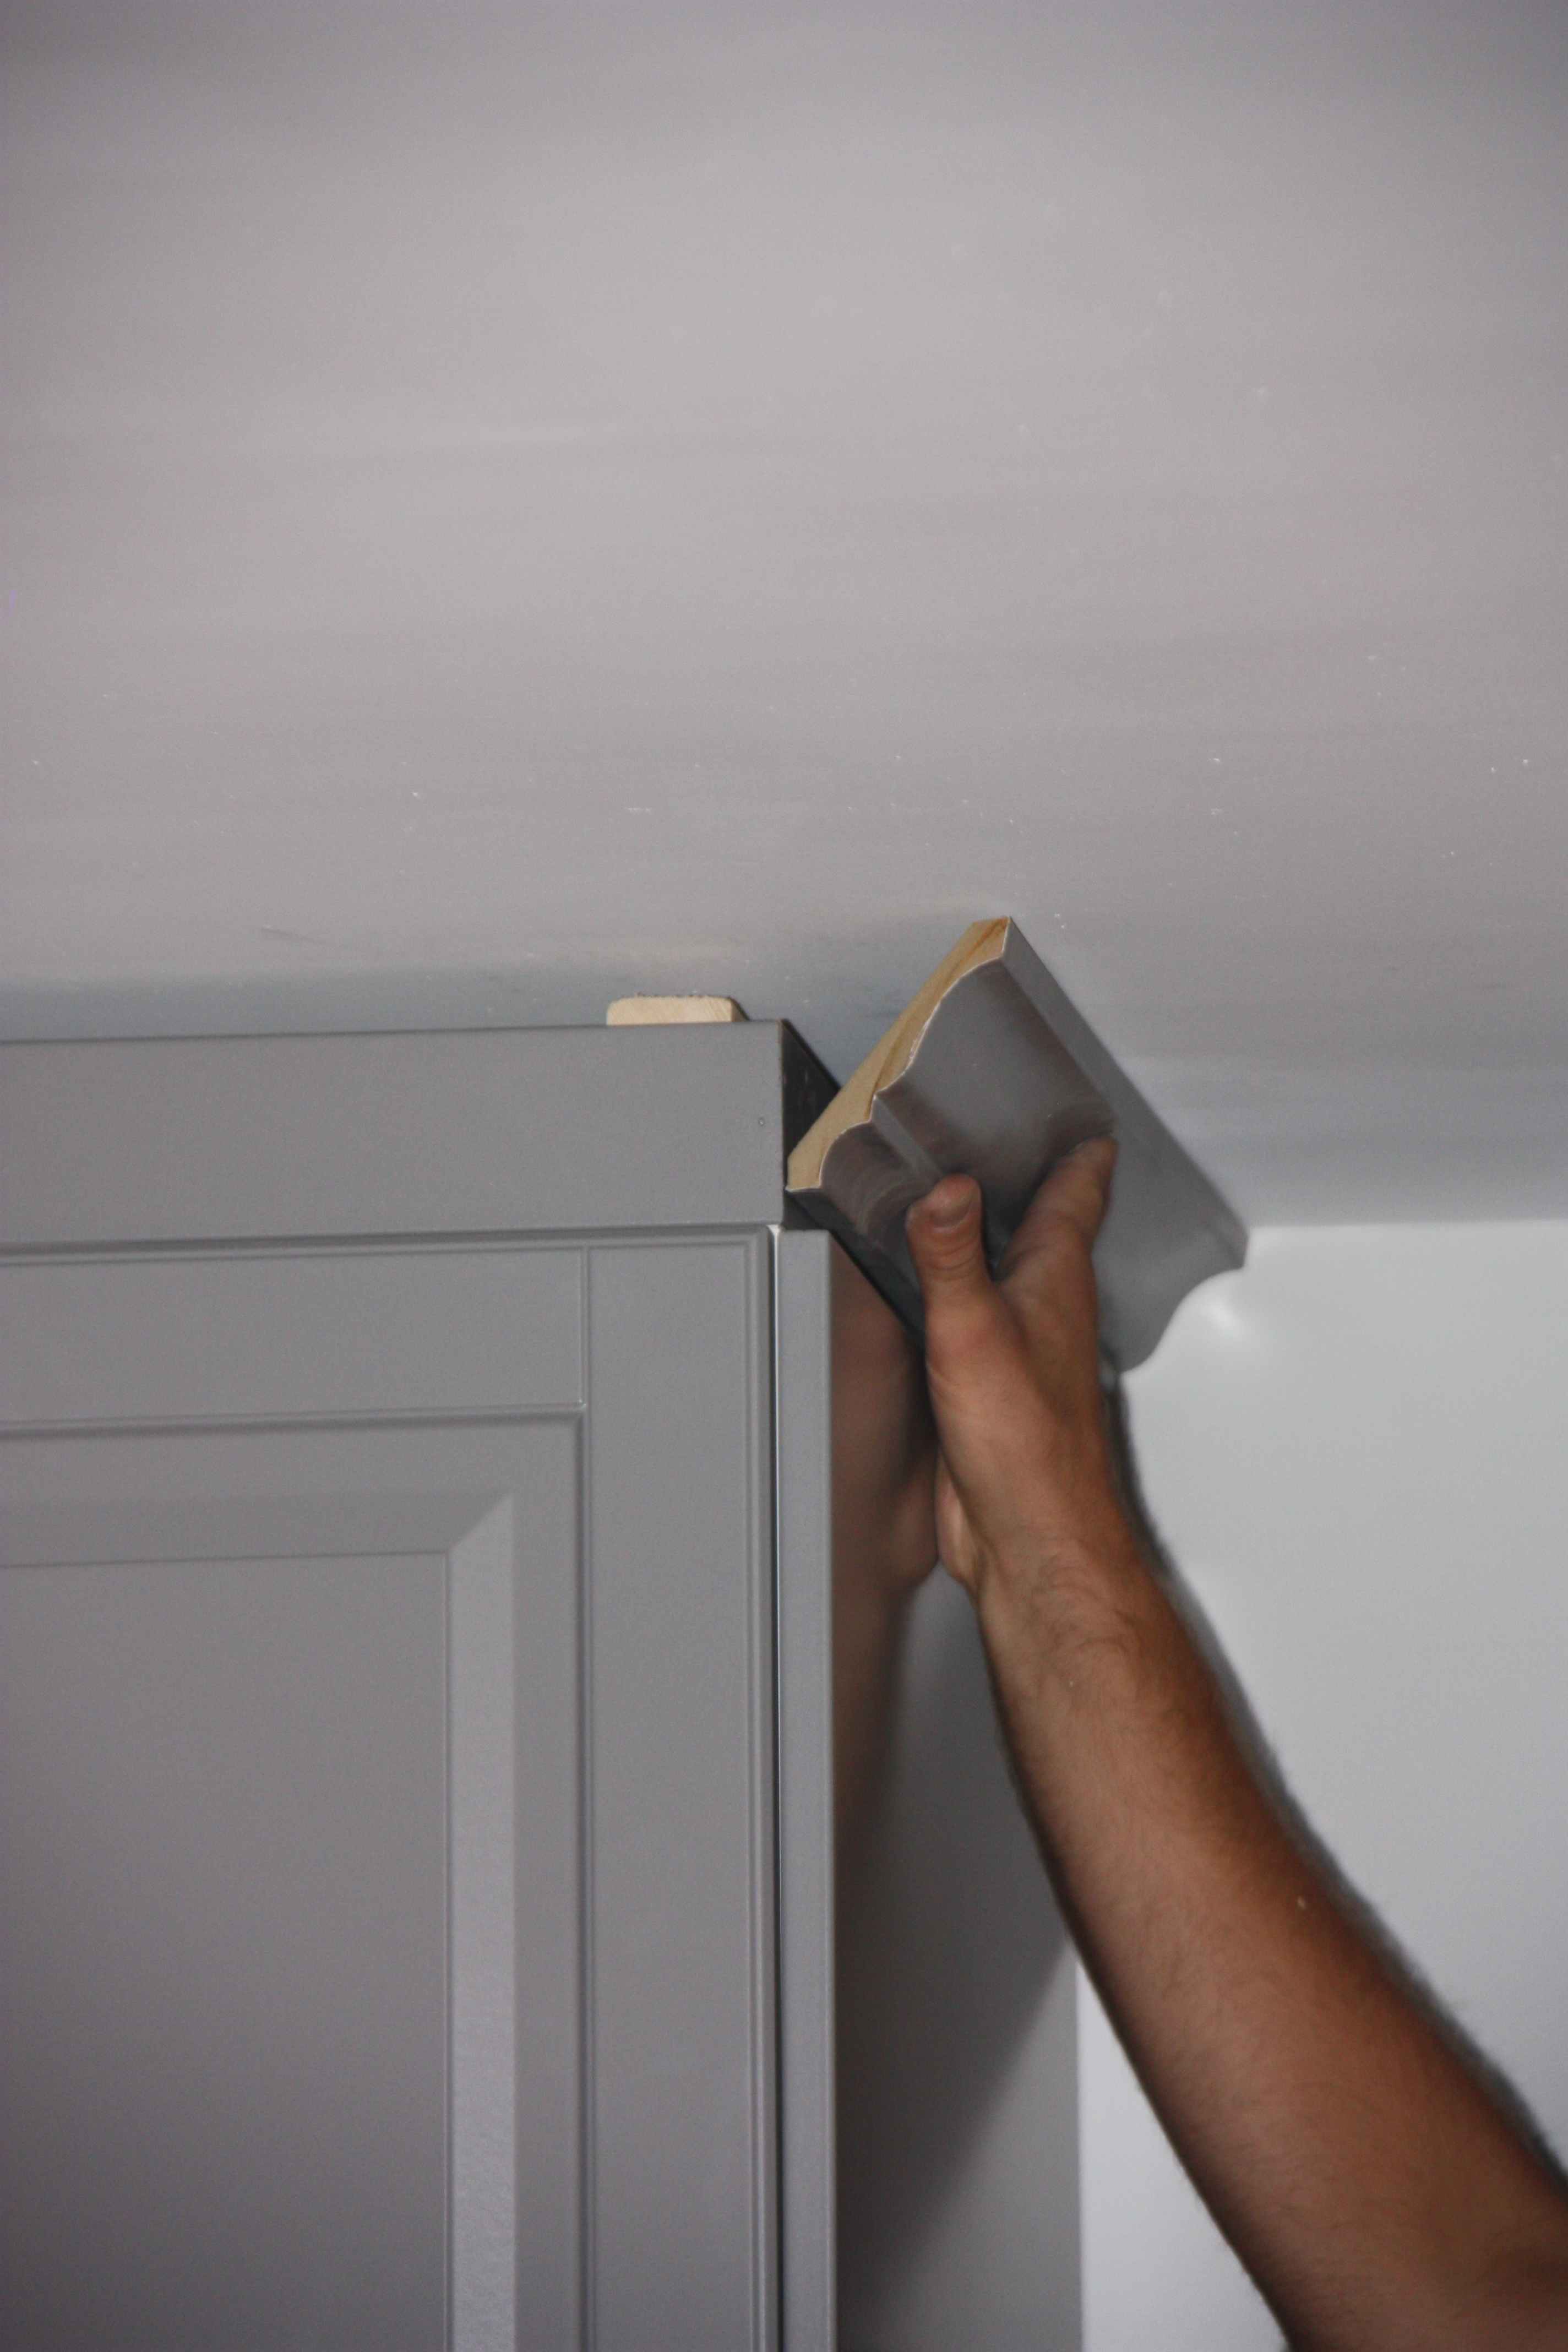
I think the crown goes a long way in making the cabinets look a bit more custom.
Perhaps you remember the industrial style light I talked about here. Please excuse the fact that this isn’t a very finished shot of the light. Still grouting and caulking that needed to be done. We ended up having the incorporate a block into the trim for it to sit on because it was too tall! But now that everything is finished up I think it looks just fine.

After we got all the trim work done, we decided to throw a birthday party at the house and since we didn’t have any countertops yet, Aaron cut up old doors and we used those as countertops for a couple of weeks.
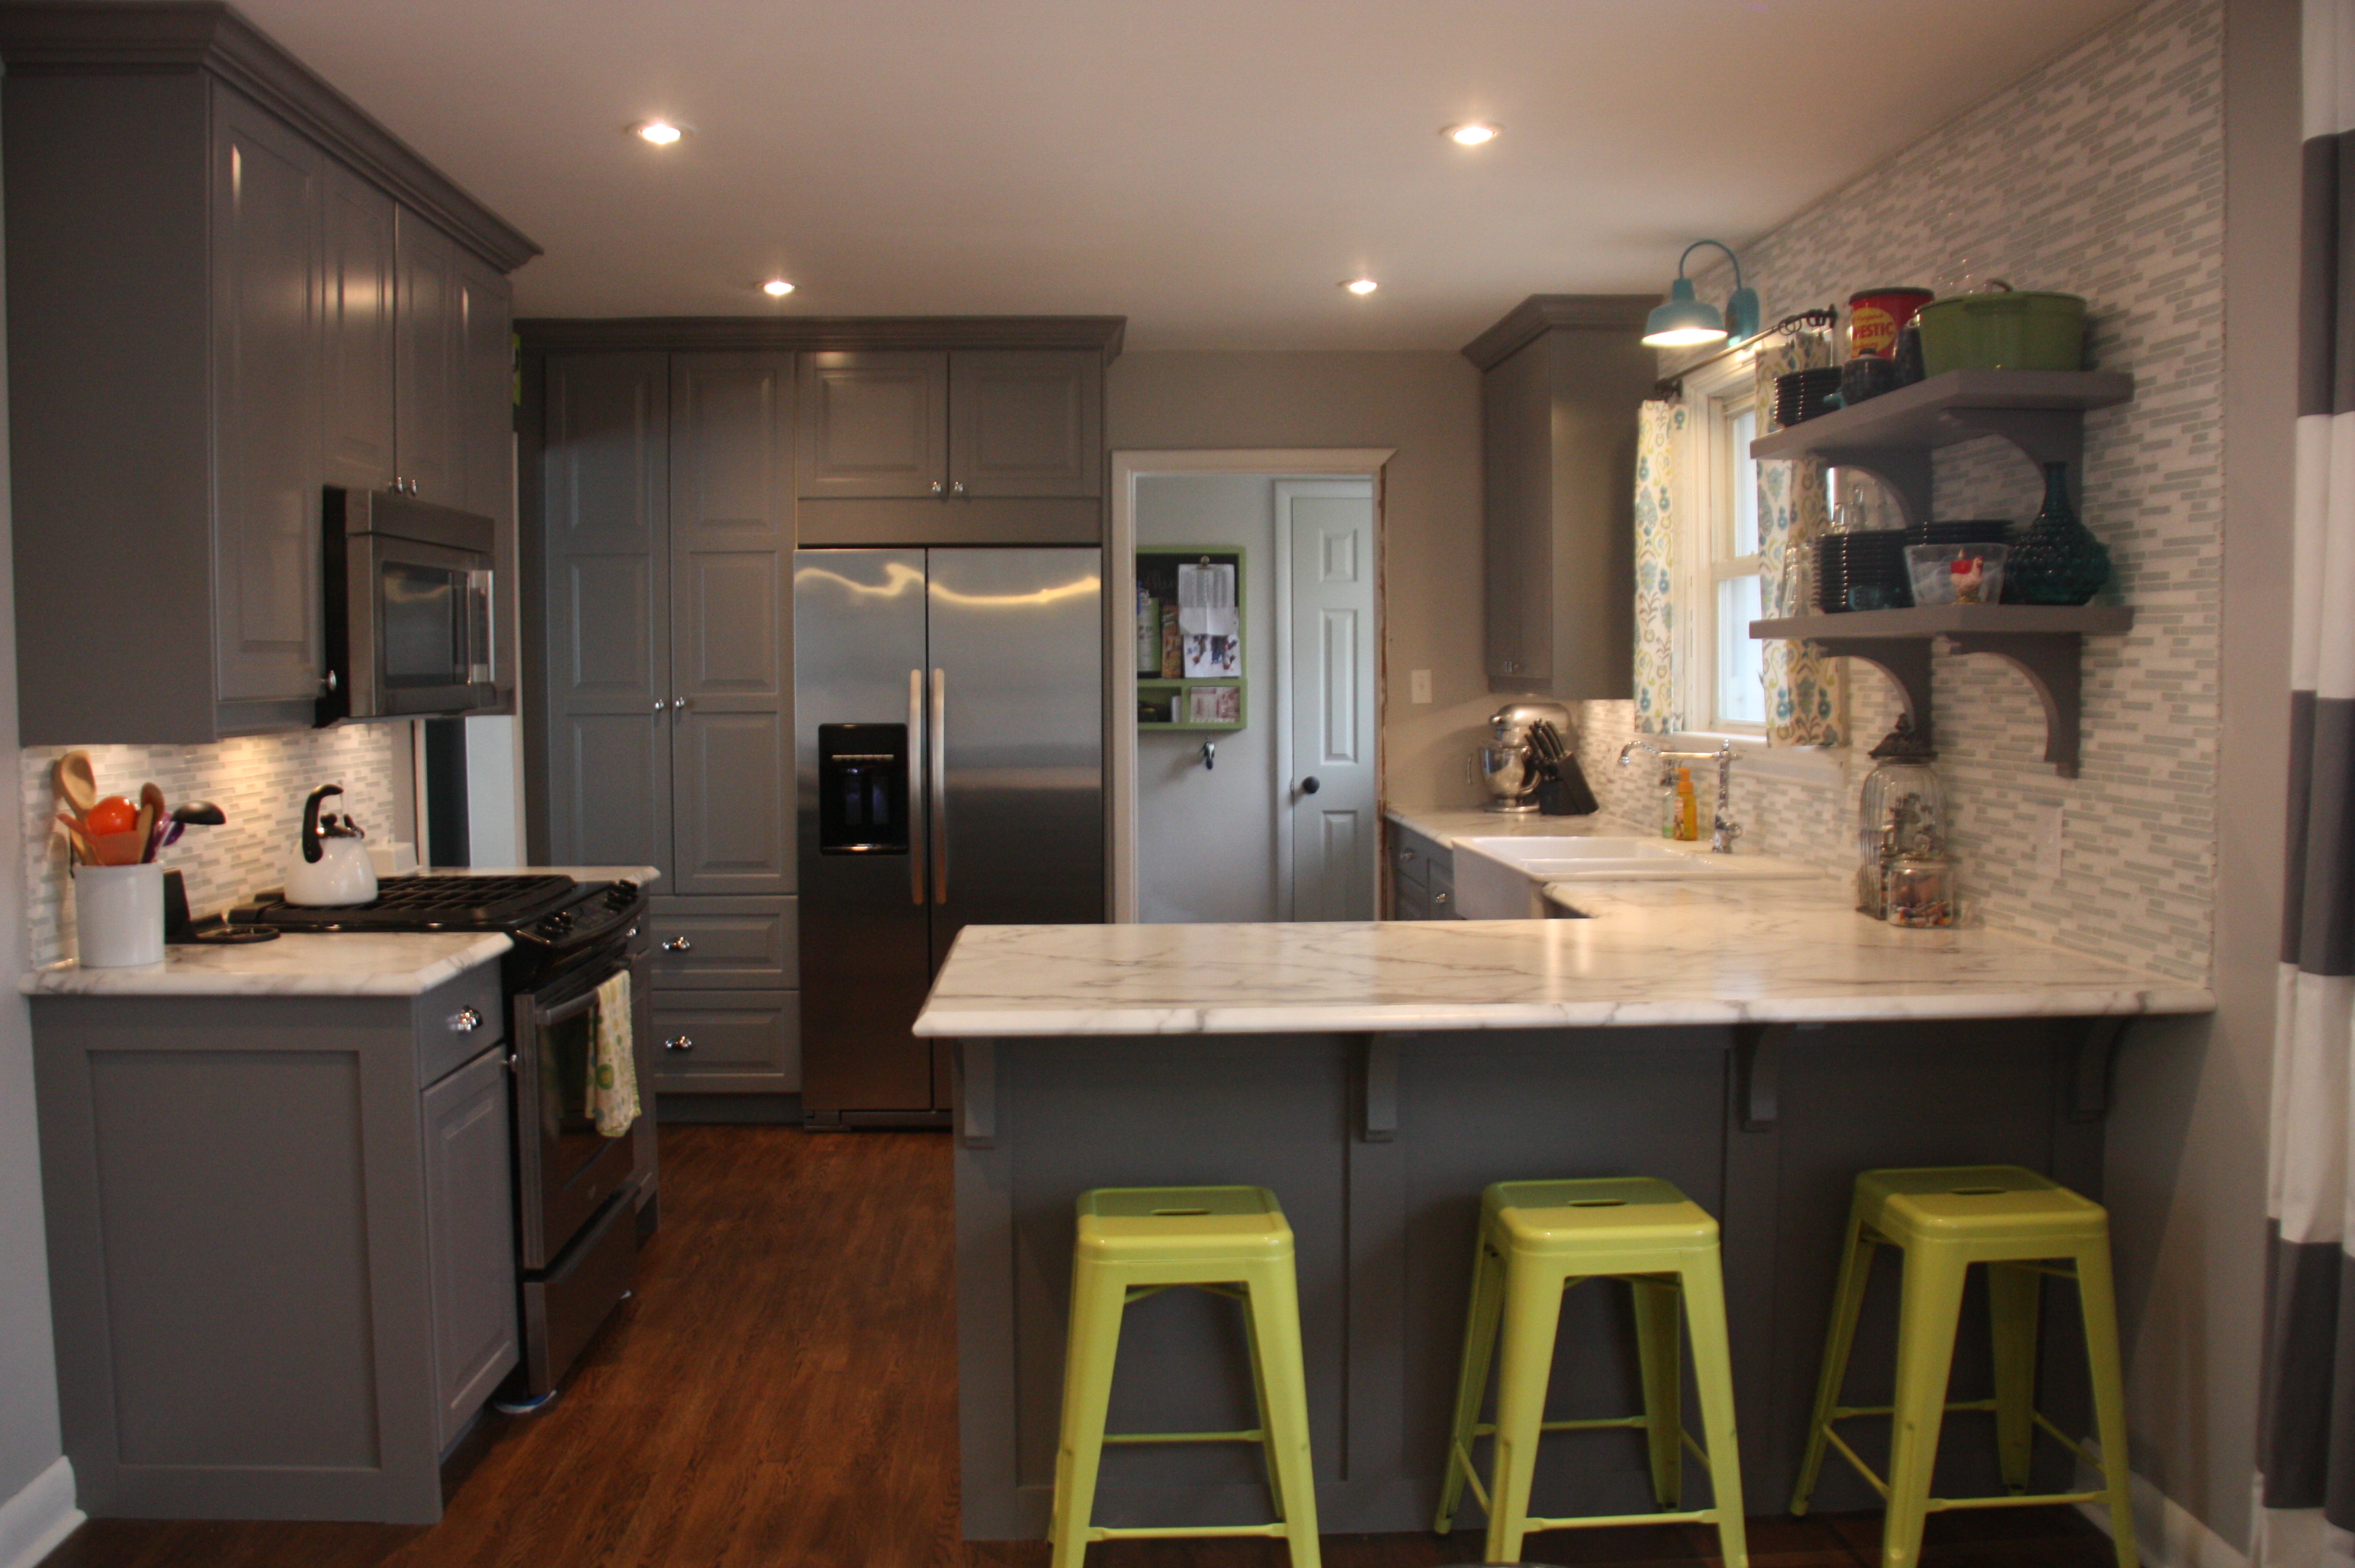
The countertops we were waiting for were Formica 180FX series in Calacatta Marble. We had a friend make them for us and he did a fabulous job. There are no seams anywhere which looks great because it is a large scale pattern. He also used Formica’s newish Ideal edge which allows an edge profile to be wrapped around the entire counter instead of having one flat side. We opted for laminate because we couldn’t afford real stone. Even if we could it would be unwise to put such an expensive material in such a modest house. We likely wouldn’t get our money out of it and we are really happy with the look we achieved in using laminate so all is well!
Once we got the countertop in, Aaron put up our tile backsplash. It is mixed glass/marble and is from Costco. I got it on sale for $4/sq. ft. Again, I would have loved to do an all marble subway tile or penny tile backsplash but this gives a similar look and we needed about 45 sq. ft. because we were going right up to the ceiling and a difference of $6-8 per sq. ft. over 45 sq. ft. is a difference of a few hundred dollars.
After we got the tile up, we put our open shelving up. We opted not to put another cabinet on the right side of the sink because we felt that it would really box in the kitchen and be a big bulky eyesore while sitting near the wall at the peninsula. I also really like the look of open shelving and it seems functional for dishes and glasses that you use everyday as well as providing a place to display some colourful serving dishes etc. We purchased brackets for the shelves in the states at Home Depot because they don’t carry them at the Canadian store. They were $10 each and we used them as countertop support on the peninsula as well. Aaron could have made something but I liked the shape of these and they were wood and a good thickness. 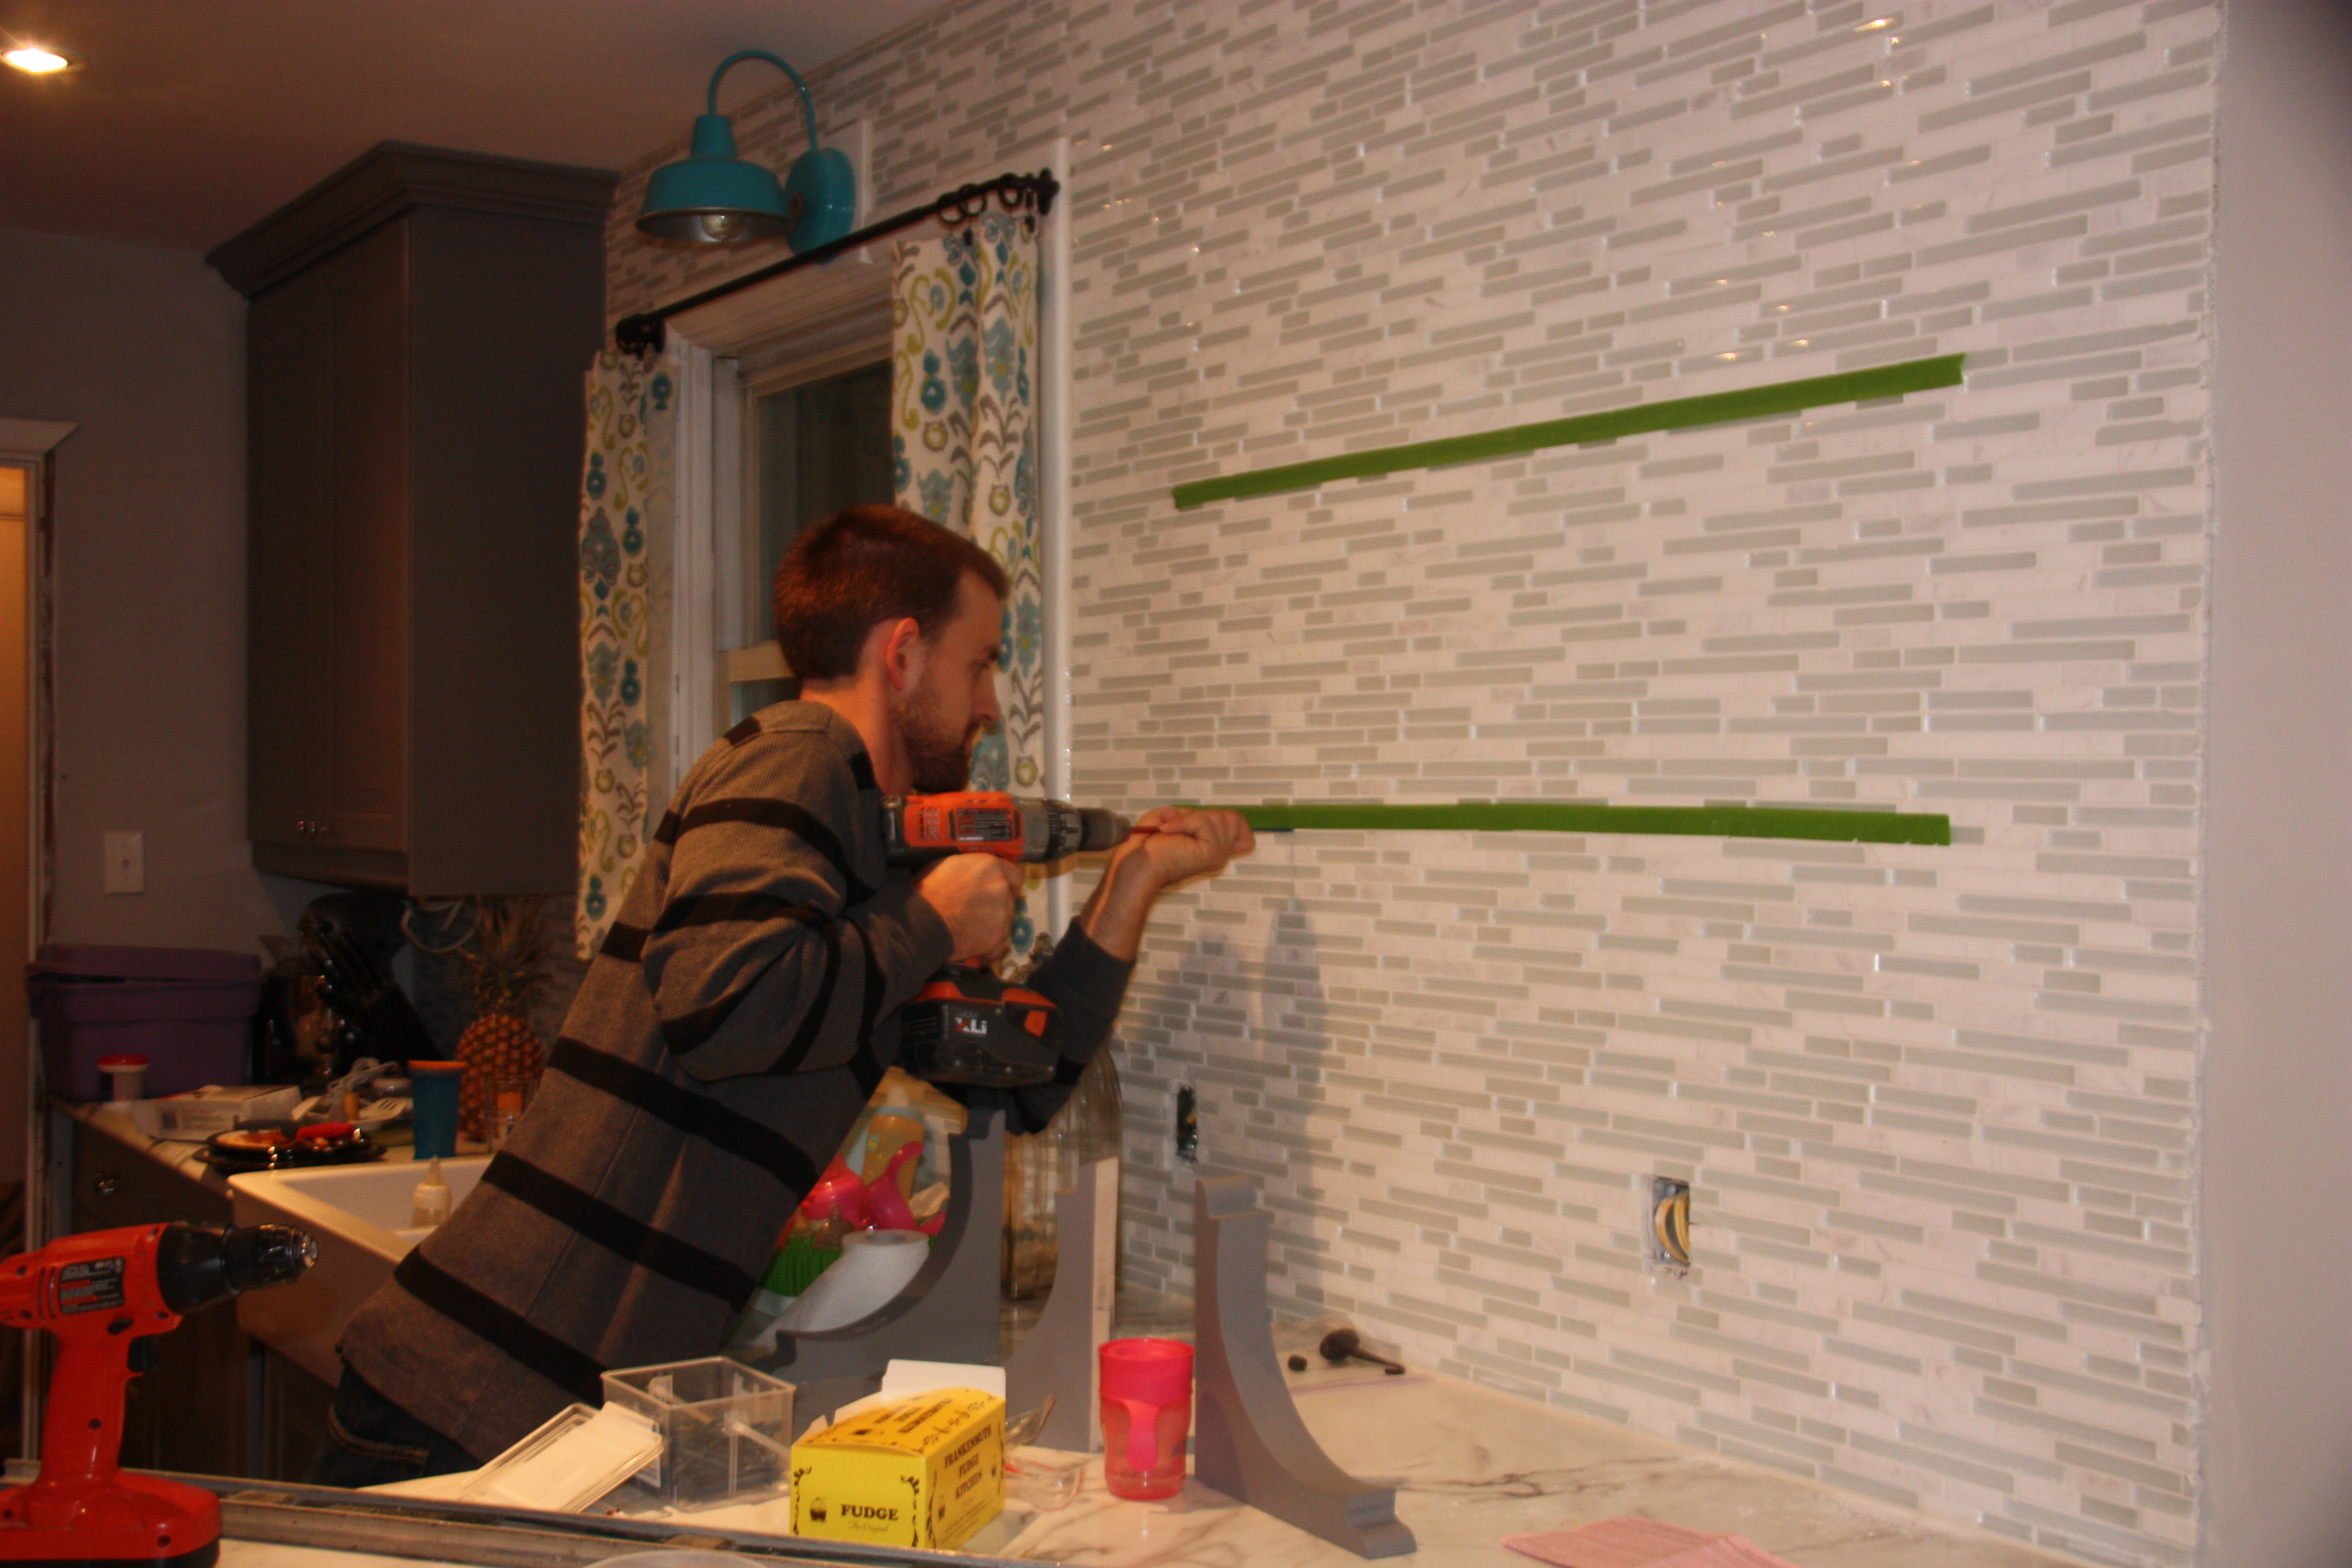


We glued two pieces of 3/4″ x12″ wood together to get a thicker shelf and then painted everything the same grey as the other trim work in the kitchen.
The last thing I will mention before the before and afters is our appliances. Originally we had planned to bring our white appliances with us. They were good appliances and we had bought them new when we moved to the last house but the fridge was quite bulky. It would have stuck out from the fridge opening 5-6″ and that’s already a bit of a tight spot in the kitchen. Our appliances ended up being negotiated into the sale of our house and it was probably one of the best things that happened for the kitchen redo. We were able to find a stainless, counter depth fridge at our local scratch and dent and it fits perfectly into the opening. I also couldn’t be happier about the water/ice dispenser on the door. It’s awesome and makes a glass of water seem much more exciting. Myles doesn’t really bother with it and it does have a locking function if that ever becomes a problem with subsequent children. Our stove is a whirlpool gas range that we got a great deal on from Sears.
Allright, here is the most exciting part of the post where I put before and after photos right beside each other.
Before:

After:

Before:

After:
Before:

After:

And here’s a shot of the stove and surrounding cabinets. I don’t have a before of that angle but it was an empty corner that was previously used for a table.
Thank you for bearing with me during such a long post! I’m not very good at progress posts so a lot was covered here. There is still a bit of work to be done with grout and a few pieces of trim that are missing but we are so happy to be living and finally cooking in our new kitchen!

Becky! This is stunning! You always amaze me with how fantastic you can make things look when on a budget. Your stuff never looks like you even had one! Congrats, it’s beautiful! I’m in love with the grey, perfect choice. 🙂
Thanks Kim! Means a lot coming from a fellow interior design person!
Love it!!! Great colour choices and tile. Not surprised, you guys always have such awesome taste. Hope you’re enjoying the Holiday season 🙂
Hi, Your kitchen looks fabulous! I, too, just bought some LIDI Gray cabinets, but am on an even smaller budget so bought only the top cabinets and am planning to paint some base cabinets I got off craigslist to match. Problem is, the top cabinets won’t come for a couple of weeks and I’d like to paint the bottom cabinets now. SO I was wondering if you have the “recipe” for the color match at Benjamin Moore. (The IKEA store is about 3 hours from our house so we can’t just go over there and get the cabinets and match the color) I’d really appreciate any help you could provide with this dilemna!
Hi Edie, thanks for commenting and that sounds like a great way to save some money and reuse existing cabinets. I just checked my paint can and unfortunately all it says is grey match. They will have it on file at our local store so I will give them a call and see if I can get that info for you!
I love your kitchen, I too am going with the Lidi grey kitchen and am customizing the trim to match. Did you ever get the concoction for the matching pain color?
Yes I did! I had just sent it directly. The product was K-628-26 Ben Pearl
and the colour formula is Y3 0X 19 S1 3X 22 R3 0X 11. Hope tht helps!
Oh that’s great! Thank you soooo much! This is going to save me a lot of headaches.
Hi Becky! Just found your blog and I love your kitchen! Beautiful job! We are about to put in an ikea kitchen as well, and I love that you put crown molding on the uppers! What is your ceiling height? We have been told since we have 8 foot ceilings, there wouldn’t be enough room to install crown molding…but I feel like there has to be! Hoping yours is 8ft so I can copy!
It sure is 8′! And we also used the taller 39″ uppers. Its one of the largest crown moulding profiles we found and even still we had to use a little filler piece in between the cabinets and the crown so I can say with confidence that it will all fit! Good luck and I hope you love your new kitchen as much as we love ours!
Hi, Becky! What an astounding transformation! So inspiring. We are remodeling our kitchen (in Kansas) at the moment, and are planning on Formica laminate as well. I love the way yours look, but I wanted to ask if you are happy with the 90 degree corners. So often in photos I see people chopping off the corners, which is understandable since it is not possible to really round the laminate, and “sharp” corners pose more of a hazard. But it looks so much prettier the way you guys have done your corners! So have you had any issues with people hitting/banging the corners when they walk by? Also, I have been concerned about whether the “etchings” finish is too shiny/glare-y. I wish it came in a more satin finish. The sample card I have looks very shiny, but in your photos it doen’t look overly glossy. Thanks for reading this!
Thanks so much for your kind comments, Although I haven’t been actively posting I do still read comments! I really do like the countertops, but I will be honest, the 90 degree corners are sharp-ish. I have children and thankfully none of them have run into the corners (I consider this divine intervention because they are active children and it is kind of a tight area in the kitchen that they frequently run through). We haven’t run into them ourselves nor have guests. Depending on how much clearance I had in another kitchen, I would probably do them again. I have seen people do a 45 with the ideal edge, but I’m not sure if that would work for your application or if it’s the style you are going for. As for the etchings finish, I am really happy with it. When I wipe my counters down I just quickly follow with a dry towel so that there are no streaks left. But I don’t feel that it is too shiny and I really like the little bit of sparkle it adds. Hope that’s helpful!
I love your kitchen and I am getting ready to order these counter tops. I read where you did the etchings finish, but which ideal edge profile did you choose? Thank you!
We did the ogee profile. Hope that helps!